My reviews are based on my personal experience with a product or event. I am not a professional product tester nor do I get paid for any of my blog posts.

The items that I post reviews on, have either been purchased on the internet or through a local vendor. Additionally I will review items that I got on sale, as a gift or as a sample from either the manufacurer or some other source.

Note: always read the manufacturers directions on how to properly use a product and craft carefully. Additionally, I am an Amazon Associate and may earn a few cents (literally) from your clicking on my Amazon links. Since they raised the minimum payout from earnings to $10 I haven't seen a credit for a while but eventually I will get one.

Every penny counts when trying to set a budget to get supplies to use for my reviews, tutorials and hauls. However, you do not have to use my links. You can use your favorite search engine to find the best price for your budget.
sewing
Showing posts with label sewing. Show all posts

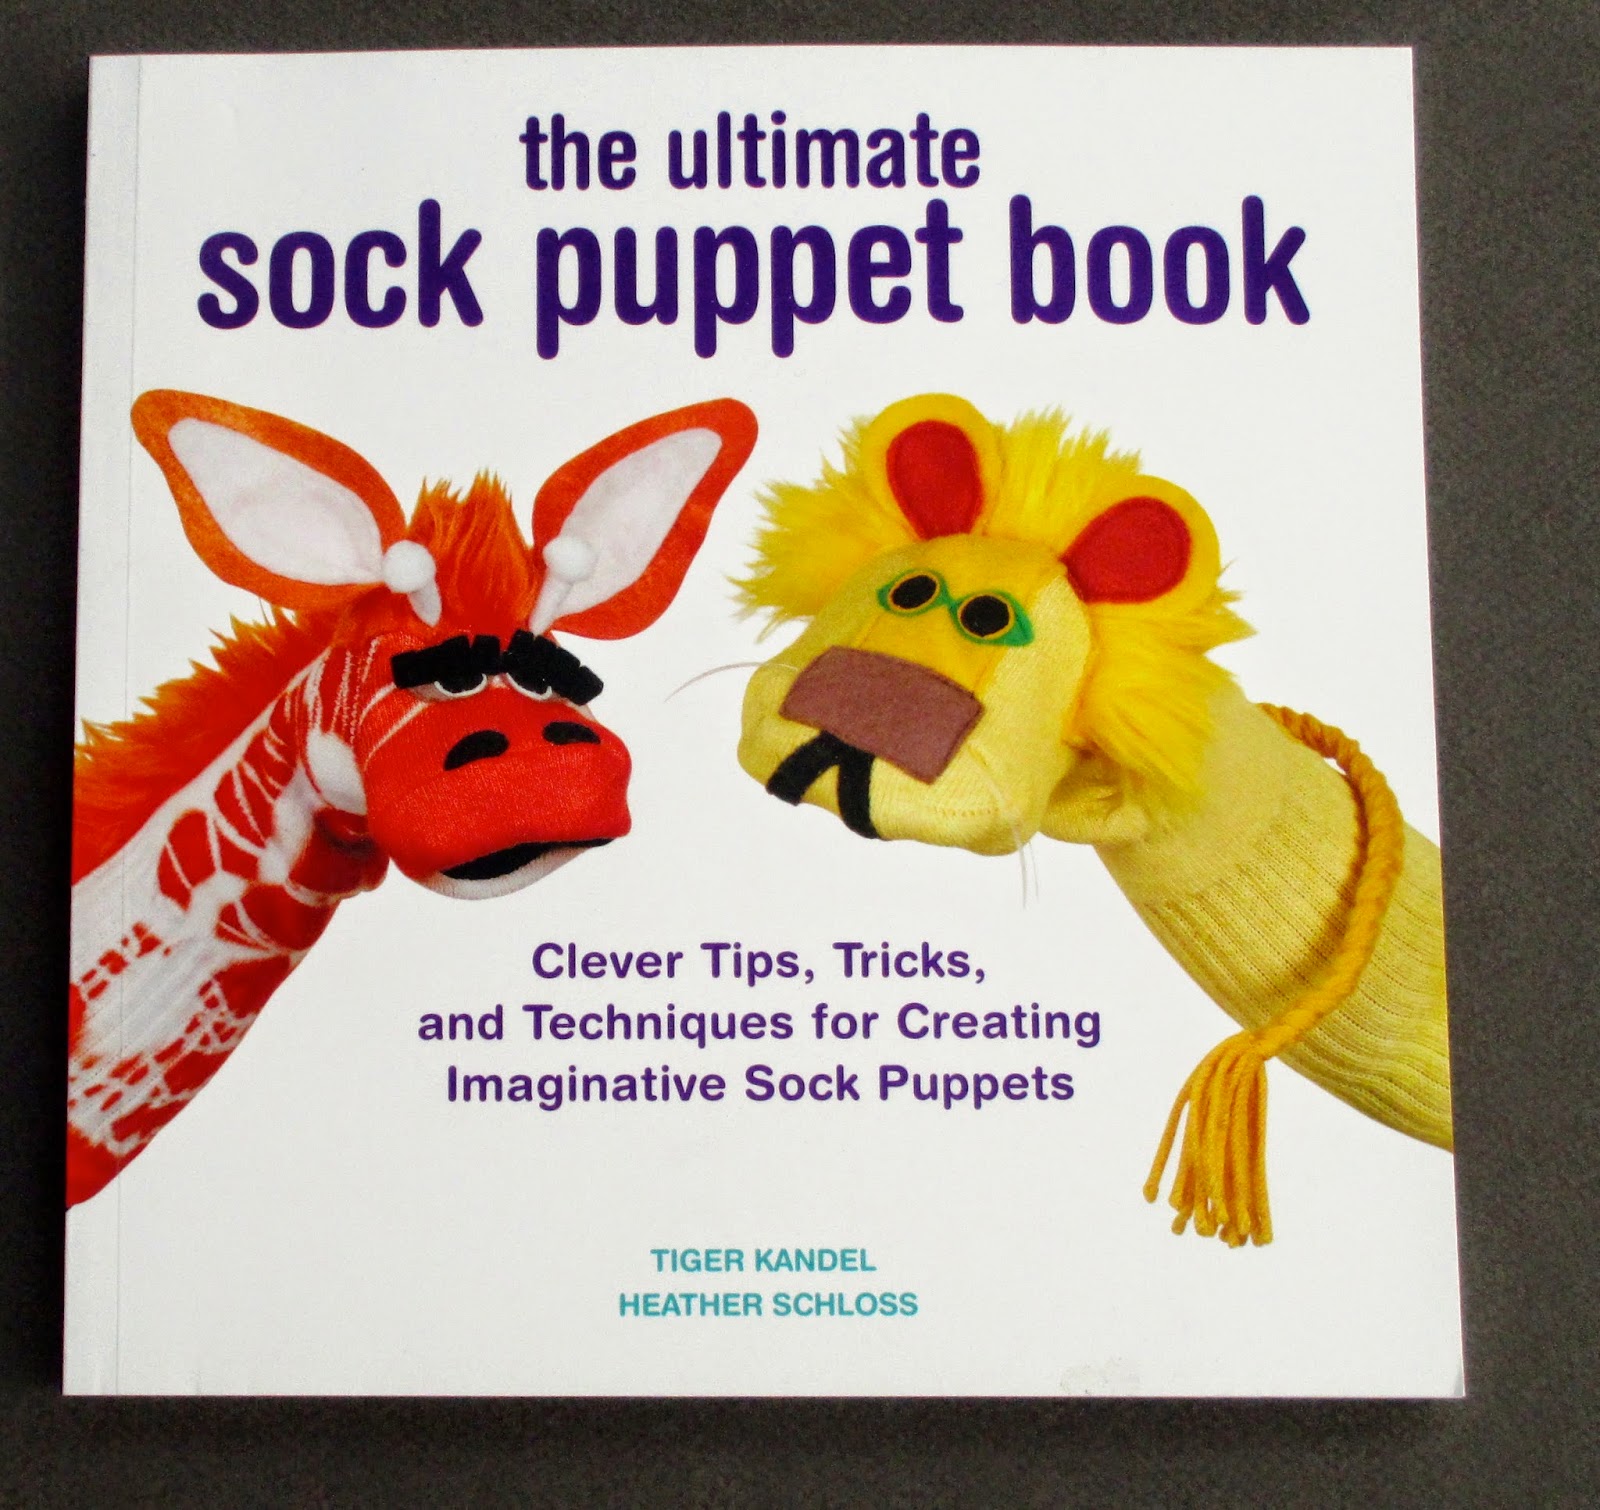
The Ultimate Sock Puppet Book: Clever Tips, Tricks and Techniques for Creating Imaginative Sock Puppets by Tiger Kandel and Heather Schloss | Book Review


The Ultimate Sock Puppet Book: Clever Tips, Tricks, and Techniques for Creating Imaginative Sock Puppets by Tiger Kandel and Heather Schloss.
Sock puppets have always been successfully used in story telling, as well as fun to make. We used puppets a lot at the local library story telling hour when my kids were really little. Now my kids want to continue the tradition by making some sock puppets to entertain their younger cousins.

As the title says, this books does offer some great techniques and tips for making sock puppets. However, the book offers so much more than some simple sock puppet patterns. It is filled with techniques and tips which can be applied to many other types of creative projects. Which is why I am including a flip video with this review, to give you a better idea of the vast variety of ideas and projects this books offers the reader.


In the introduction the author points out that in the "Ultimate Sock Puppet Book" you won't be told specifically what to make or exactly how to make it. Instead this book offers a base of techniques to build upon. The book is offers an anatomy section for making all the animal body parts in all sorts of fun ways. They make it easy for the reader to find a specific section on how to make a tail or add teeth. It also covers hair, fur, eyes, noses, mouths, teeth, wings, arms, legs and more! If you wanted to make a certain animal that wasn't featured in the book you could pull together all the elements and you would be all set to create your own version of that animal in a sock puppet. If you wanted to create something from your imagination you would also be well equipped with all the techniques you would need to create fantasy critters and creatures.


The book covers both sewing and gluing construction methods and since the kids are not big fans of the sewing, they will be using the gluing methods for sure! However, the sewing is pretty simplified so if you have basic sewing skills, they are easy to follow. I recommend this book to anyone looking for a new inspirations on how to create their own sock puppet menagerie or just be inspired. The Ultimate Sock Puppet Book projects are also fun family orientated craft projects that are both fun and educational.

Book Review: Precut Patchwork Party: Projects to Sew and Craft with Fabric Strips, Squares and Fat Quarters by Elaine Schmidt


   I love that the new book "Precut Patchwork Party: Projects to Sew and Craft with Fabric Strips, Squares, and Fat Quarters" by Elaine Schmidt utilizes the often overlooked gorgeous precut fabric squares and shows the reader how to use them to make fun and easy projects in a short time frame. What is even more exciting is that this book inspires me to cut old shirts into useable strips that I can apply to projects to upcycle old fabric into something useful. 
     These days, the selection of beautiful fabric patterns that are available in precut fabric squares is amazing. However, I do not have time to make a quilt. Thankfully this book shows the reader how to utilize some of those squares and make them into useful home décor and gift items. Most of the projects can be done in an afternoon, which is about all the time I can spend on a project with my schedule. Here is a list of the projects offered in this cute book:

Home Decor Projects

  • Reversible table runner
  • Mix and Match placemats, napkins and napkin rings
  • Patchwork Table Topper
  • Director's chair cover
  • Modern patchwork pillow and lampshade
  • Window valence and pillows
  • Modular headboard and accent pillows
  • Tea cozy, trivet, and tea towel,


Accessories, Weables, and Gifts

  • Pretty pleated purse
  • Reversible tote and clutch bag
  • Hobo bag
  • Easy, breezy little girl's dress
  • Roll and ruffle skirt
  • Snuggle Blanket and soft blocks
  • Duffle bag and pillowcase
  • Bargello Yoga mat bag
  • Tisket tasket fabric basket
  • Mommy and me aprons, pot holder and oven mitt

    The author, Elaine Schmidt, explains the difference between fat quarters, strips, squares and fat eighths to the reader, as well as how to prepare for sewing. There is also a section on sewing supplies. I really like the way the author kept this section simple.
    There is also a general techniques section that has some great photo's which offer a visual of the various techniques. I especially liked the explanation on how to make box pleats, it was simple and straight to the point. The author made the directions for this are simple and easy to follow, even for a beginner level sewer.
    Precut Patchwork Party: Projects to Sew and Craft with Fabric Strips, Squares and Fat Quarters includes projects that will appeal to a variety of different level sewers. I think that advance sewers would already know a lot of the techniques in the book but might enjoy the fun projects. It is really a matter of what a person is looking for in a project. 
     My daughter, who is a beginner sewer, loved the rosette project. It is a great way to use those left over pieces of fabric.  It would also be a great project for use with recycled fabric from old clothing.


    As you can see it is a simple project that can be completed in less than a half hour with minimal hand sewing skills. Some of the other projects are a little more complicated and I would recommend working with your child if they want to make them. 
    This book also includes a few patterns. There is a pattern for the "roll and ruffle skirt", the pot holders, the duffle bag and the pillow case.  Most of the projects are made from squares or strips, so you do not really need a pattern since the directions are so straight forward and easy to follow. 
Another great example of how is the directions are, is the tea cozy project, where all you need to do is measure the tea cozy and use pre-measured strips of fabric to sew it together.  It is a project that is easily completed in an afternoon.  I really enjoyed reading this book.  The book has a lot of straight sewing and beginner level techniques which provides a nice foundation for my daughter and I to do some of the projects together. There is also a very cute "pretty pleated purse" project that I am hoping to find time to make. That one will take an afternoon.
     I would recommend "Precut Patchwork Party" to any beginner level sewer who wants to be able to complete a cute project within a short time span. 


Disclaimer


A review of how to use the Extra Small Kanzashi Pointed Petal Flower Maker from Clover

The Clover Kanzashi Extra Smal Pointed Petal Flower Maker from Clover is easy to use and makes Kanzashi flower making a fun and easy task.

Flowers on wreath are made with the Kanzashi Flower templates

At a trade show I attended, I stopped by the Clover Mfg. booth to see what was new and found out that Clover had released some new Kanzashi Pointed Petal Extra Small Flower Maker templates in January 2012.  These are significantly smaller (extra small flowers are 1 1/2")  than the ones they had previously released (regular size flower 3") and are perfect to use for making jewelry and hair pins like the one in the photo below.
1 1/2" flower made with the extra small Kanzashi Round Petal Maker
I talked to Tami Bayer, who is one of the product demonstrators (and designers) for Clover and asked her to do a quick demo which I taped for my readers.  You can see how easy it is to use the round petal Clover Kanzashi Flower Maker Round Petal X-Small.


I decided to see how easy these really are to use, so I picked up a Kanzashi Pointed Petal Extra Small Flower Maker to test out.


Step 1: 

Pick your fabric and cut a  2 3/8” x 2 3/8”   square and set it face down into the template.  Fold the template at the center to sandwich the fabric and make sure it is snapped shut.  (The back side of the fabric should be facing out.)  

Step 2: Trim excess fabric from around the template.


Step 3:  Take a needle that has been threaded with quilters thread (it is stronger and easier to work with)and tie a knot at the end.  Look at the template and locate the number one marker on the template.  You will begin your stitches from first hole that is labeled number 1.  The  template has numbers 1 through 8 marked on the template and lets you know if you are putting the stitches in the correct spots.
For the best possible results, you should stitch according to the markings on the template.

  
 Step 3:  Once you finish stitching petal, remove the petal from the template.  Do not remove the needle or cut the thread at this point.  
Front side

Back side of petal
Step 4:  In order to finish the petal, you need to fold the petal in half.   

Step 5:  Then you need to gently pull on the thread to gather the fabric and form the pleats.
Note:  I found that the petals needed an extra stitch to improve their stability and shape, so I added a stitch to each one.

        Step 6:  You can leave the needle and thread attach to the petal and repeat steps 1-3 to make the next petal.


Step 7:  Repeat the process 

until you have five petals attached to the needle and thread.  Then pull the thread until the petals
form a flower and stitch it closed. 
Step 8:  Add an embellishment and you are done.
Each petal template comes with a set of written instructions that make it very easy to begin making your own Kanzashi  Flowers.

Tips:
1. The type of fabric you use will affect how the petals come out.  Some of the heavier fabrics require you to work on the bias to get a good petal result.  Some fabrics (like the one I used) require an extra stitch to maintain the shape.
2.  You can use pins to hold the petal in shape if you do not want to keep it attached to the needle and thread while you work on other petals.
3. It may take some practice to make the petals come out right.  As I mentioned before, each fabric will work differently with the template and you will have to make adjustments accordingly.

The Kanzashi Flowers are great to use for decorating hair clips, sweaters, pillows, art journals, 

and so much more.   If you make the flowers out of rich white satin fabric, they are great to use for wedding décor purposes.  You can also use the flowers to make some fun wall decor, like in the example below.

The pointed petals look really fun if you sew a crystal onto the tip of the flower to give it a little sparkle.     If you prefer "How To" videos, I recommend going onto YouTube and watching additional "Kanzashi Flower Making" tutorials.


Zakka Handmades Blog Tour 2013 With Give-A-Ways at Every Stop.

Zakka Handmades Blog Tour 2013, begins today and runs through Wednesday, July 17, 2013.  At every stop, readers get a chance to win a copy of the new book "Zakka Handmades" by Amy Morinaka.


The list below are a very talented group of bloggers and designers who are taking part in the Zakka Handmades Blog Tour:


6/24/13 - Kerry verykerryberry  (interview post)
6/26/13  Sachiko Tea Rose Home 
6/28/13  Jeni In Color Order 
7/1/13 – Amber One Shabby Chick 
7/3/13 – Kristen Feeling Stitchy 
7/5/13 – Hiromi Harujion Design 
7/8/13 – Amy nanaCompany 
7/10/13 – Lisa and Sarah A Spoonful of Sugar 
7/12/13 – Mette Erleperle   
7/15/13 – Sarah and Rachel Roxy Creations 
7/17/13 - Anna Noodlehead

Note: They will have a giveaway at every stop so make sure to follow along with the tour!

chick chick sewing

Feel free to grab the button above at Amy's blog:

このたび、著書の出版にあたり、上記の日程で「ブログツアー」を開催することになりました。ブログツアーとは、懇意にさせていただいている手芸ブロガーさん方のご協力のもと、皆さんそれぞれのブログで私の著書を紹介していただく企画です。

ブロガーさん方のご協力なしでは実現できない、大変有難い企画なのです!今回、快く引き受けて下さったブロガーさんは、皆さん揃ってお忙しい人気ブロガーの方ばかり。お住まいの地域も、アメリカ、オーストラリア、デンマーク、イギリス・・・など世界各地から参加して下さいます。

ブログ中にはプレゼント企画もありますので是非皆さんも遊びにいらしてくださいね。


How to Make a Purse: Patterns for 20 projects from FaveCrafts.

Even if you are new to sewing, you can enjoy making some fun handmade purses and totes
Click on FaveCrafts to get link.

(along with instructions) with this "Free" eBook from FaveCrafts, called "How to Make a Purse: 20 Patterns for Sewing Totes and Purses." This is a great opportunity to learn how to make a tote or just add to you pattern collection.
    The book also offers some great inspiration for those last minute handmade gifts or for making that special purse to go with a costume like the one below which I am thinking of making to go with a fairy costume for the upcoming Labyrinth Masquerade Ball.  I will probably use a smaller flower and add some leaves onto the fringe.

So pop on over to FaveCrafts and check the book out for yourself and see if it inspires some creative ideas for you.  The site has hundreds of tutorials and patterns in paper crafts, jewelry making, crochet, knitting and so much more. Below is a short video that FaveCrafts has on YouTube that gives the viewer a better idea of some of the fun projects that are in the ebook.


The Original Renaissance Pleasure Faire Crafts on Display


For my fellow avid crafters, a look some of the different "Arts & Crafts" opportunities that are

offered at the local Renaissance Faire.

The Renaissance Faire also offers visitors the opportunity to watch daily demonstrations of different types of crafts by various artists that are scattered throughout the faire.

The Renaissance Faire offered visitors this year a wonderful selection of crafting classes for both children and adults through their

"Queens College" program.  They had skilled leatherworks who taught students how to make their

own messenger bags from scraps of leather.  The students also got to decorate their bags with an

interesting assortment of ephemera that helped give the bag its own theme.

Children who visited the faire had their own opportunities to learn some fun crafts at "Kings

Kingdom".  These included making cloth dolls, wheat weaving, embroidery, spinning, herbal sachets

and other fun projects.  They even had the opportunity to learn simple chainmalle techniques.

One of the guilds was demonstrating weaving and spinning techniques.

Another fun craft class was a rose bud necklace workshop.

And for the embroidery enthusiasts they had black work demonstrations.

You can see some of the beautiful blackwork accents on the necklines of the chemise that these two ladies are wearing.
A close up view of some blackwork done on the collar line of the chemise.

The "Inkle Loom" workshop offered a chanace to make some hand woven belts.
The hand woven belts in the picture below are made using two different size inkle looms.
They also offered two ribbon folding workshops. One was to decorate a fan with ribbon and

the other was to make a key fob or pin holder (like the one below).
There was a simple beading class that incorporated feathers to make the fun pin below.

The pulled thread workshop at the faire site that looked pretty interesting and easy to learn.

The classes were very affordable and ranged from $5 to $35. Tthe classes included the cost of supplies which made it an even better deal.  So next time you go to a Renaissance Faire, keep a look out for crafting opportunities and a chance to learn some new techniques.

Disclaimer