My reviews are based on my personal experience with a product or event. I am not a professional product tester nor do I get paid for any of my blog posts.

The items that I post reviews on, have either been purchased on the internet or through a local vendor. Additionally I will review items that I got on sale, as a gift or as a sample from either the manufacurer or some other source.

Note: always read the manufacturers directions on how to properly use a product and craft carefully. Additionally, I am an Amazon Associate and may earn a few cents (literally) from your clicking on my Amazon links. Since they raised the minimum payout from earnings to $10 I haven't seen a credit for a while but eventually I will get one.

Every penny counts when trying to set a budget to get supplies to use for my reviews, tutorials and hauls. However, you do not have to use my links. You can use your favorite search engine to find the best price for your budget.

DIY Half Pumpkin Crafts - Halloween Sparkly Spider Craft Tutorial


My local Michaels store put their half pumpkins on sale for 60% off, and then we were able to apply a 20% off the entire purchase, so we bought quite a few of these fun to create some fun half pumpkin halloween craft projects and use up the Folk Art Home Decor chalk Paint.  This tiny 2 ounce bottle really seems to cover a lot of surfaces.    We have been having fun coming up with ways to use this paint and loved adding it to our family Halloween craft stash.  This particular sparkly spider themed half pumpkin door decoration is one of the projects we came up with and it is pretty easy to make.


Materials Needed:
  • Harvest Market – Half Pumpkin (Michaels Stores)
  • Fabric Leaves (dollar store)
  • Plastic spider rings (dollar store)
  • Large Plastic glitter covered spiders (dollar store)
  • Jewel Bling Strips (eyelet outlet)
  • Small rhinestones


Supplies Needed:

  • Folk Art Home Décor Chalk Paint in Rich Black
  • 1 “ Plaid Mod Podge Tools Foam Brush
  • A6000 glue
  • Glue Gun
  • Scissors
  
Step 1:
Remove tags from the pumpkin and clean it off. Then, using the foam brush, paint the pumpkin with some broad strokes of the Rich Black Folk Art Home Décor Chalk Paint.  Make sure to leave a lot of white space on the pumpkin.

Step 2:
Use the scissors to snip off the plastic ring part off of the spiders.


Step 3:
Use the A6000 glue to adhere a rhinestone onto the back of each spider.


Step 4:
Using the A6000 or the Glue Gun, adhere the black leaves onto the top of the pumpkin.

Step 5:
Carefully lay out the jewel strips, making sure to vary the lengths. Remove the plastic backing and adhere to half pumpkin. 


Step 6:
Using the hot glue gun, carefully glue the spiders onto the ends of the jewel strips.  Be careful not to get burned or to melt the spiders.

Step 7:
Adhere the Large Spider to the top of the pumpkin. Be careful to place it where it won’t interfere with the how the pumpkin hangs.

Step 8:
Hang the Halloween Spider Themed Pumpkin on your door and enjoy.


Note:  I paid for everything used in this project except the Folk Art Home Décor Chalk Paint in Rich Black.  Thank you to the folks at Plaid who sent me this cool 2 oz bottle of chalk paint, so far we are loving it. For more Halloween Crafting ideas, check out Plaid online or my Halloween Pinterest page.


DIY Halloween Haunted House Shadowbox


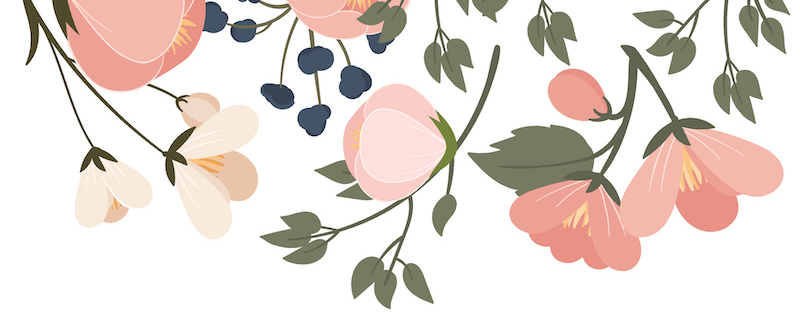
I always love seeing the cute little DIY Halloween themed haunted house vignettes or shadow boxes that I see posted on Pinterest so I thought I would try to make one this year.  I started by purchasing a really cool basic Halloween Haunted House Shadow Box Kit from Michaels Craft store.  After using my 40% coupon I ended up paying around $12 for the kit.  The kit is pretty inclusive.  It has almost everything you need to make the fun Halloween Vignette, and yet it allows the maker to still add a few personal touches to it.


Materials Needed:
Recollections Halloween Paper House Box from Michaels Crafts
Asst Halloween Themed Stickers
Asst Halloween pins
Asst Charms
Black ribbon or lace


Supplies Needed:
Martha Stewart Crafts – Fluorescent Acrylic Paint in Orange
Martha Stewart Crafts – Fluorescent Acrylic Paint in Yellow
Folk Art Home Décor Chalk Paint in Rich Black
White Gesso
Glue Dots
Glue Stick
Scissors
Tweezers
Sponge Paint Brush


Step 1:

Since the house is made of brown paper, I realized I would need to pick a base color.  So I painted the interior of each room of the haunted house shadow box in one coat of white gesso (do not paint the outside parts).  This will create a nice base to show off the different colored paints that are used to paint it with.

Step 2:

Using the Martha Stewart Glow-in-the-Dark acrylic craft paints in Orange and Yellow, I painted the interiors of each room in the Recollections Halloween Paper House Box in alternating colors.  Then I set it aside to allow the shadow box to dry.

Step 3:

Then using the Black Chalk Paint, I painted the outer surfaces of the house.  I love this paint because it is really opaque and covered the entire surface in one coat. Once I had finished painting the surface, I set it aside and allowed the shadow box to dry.

Step 4:

I took some of the fun Halloween themed scrapbook papers I have and cut them down to fit the rooms.  I also used some of the cute papers provided in the kit.  I glued them onto the back wall of each room using a glue stick.  The paper patterns or pictures will create the theme for each room and make it easier to decide which items to place in there.  I could have followed the photo provided in the kit but I decided to do my own thing and loosely follow their example.

Step 5:

I sorted through all of the ephemera provided in the kit.  I added additional charms, tags, pins, etc. from my own collection of Halloween themed items to work with.

Step 6:

Once I decided which items I wanted to use, I started to decorate each room.  I used the glue dots to hold some of the heavier jewelry items in place.

Step 7:

To finish the DIY Halloween Haunted House Shadow Box, I decided to accent the outer frame of the house by adding black lace, ribbon, and few other items.

I love how it turned out.  I even used some light up pins to make it a bit more fun to look at.  Once the paint had dried, the actual part of decorating the shadow box only took  a short time to finish. 


This is my first try at a Halloween themed shadow box, I would love to know what others have used to decorate their boxes.  Leave a comment below and share your experience in making one of these DIY Halloween Shadow Boxes.

Once again, I would like to thank Plaid Enterprises for that cool box of paints they sent me.  I am able to apply them to so many projects.  If you want to see more creative Halloween projects, Plaid does have a bunch on their website, including their 75+ No Carve Pumpkin Decorating Ideas Post.


2016 Marion Smith Planners Lovers Retreat | Event Review Part 2

My Marion Smith Planner With Some of the Goodies I got at the Show.

The Marion Smith 2016 Planner Lovers Retreat in Pasadena California was a fun way to meet other planners and see planner related merchandise in person. There are not a lot of stores who carry the types of planner supplies that I like to use in planning my layouts, so often I have to order off Etsy or go to my local craft stores to find items.  Getting to see these Etsy vendors in person, at a Planner Event, makes it so easy to know what planner accessories will work in various planners and travelers notebooks.
DIY Flower Planner Clip

One of my favorite type of planner goody is planner clips (decorated paper clips).  I saw this cute Bunny Page Clip from the Elite Planners Club and had to purchase it.


Veronica Love, the founder of the Elite Planners Club, also had a few more of her great planner Clip designs available. Below is just a sampling.
Veronica and a few of her page Clip Designs (ElitePlannersClub.com)

The sticker selection at the show was amazing.  Stickersters had an amazing selection on display of their stickers collection.

These ladies had everything from Harry Potter Fan themed stickers to Yoga Stickers and everything in between.  They even had grab bags of stickers that did not quite make the cut for around $5 for 6 half sheets and 2 quarter sheets of stickers (a really great deal). I personally love grab bags because it gives me a great selection of stickers and it is a fun way to get acquainted with new (new to me) sticker company.
The stickers I got in my $5 Grab Bag from Stickerster
If you like the colors from the Inkwell Press Planners, then you will enjoy the selection of stickers available from The Busy Bee Shop.  These stickers looked great in my Inkwell Press planner.
Jessica Patterson from The Busy Bee Shop
I particularly liked the color scheme that she had on display at the Planner Lovers Retreat.

She has other color schemes at her shop.
Sampling of the Sticker selection from The Busy Bee Shop.


Another Great Sticker shop was Clicky Chic Creates from Etsy.  The Clicky Chic Creates pop up shop had a fun assortment of stickers.

The owner, Connie, was such fun to talk to. She has a Facebook Page and Instagram page where you can find out about new releases and sticker specials.

She designs her stickers in a variety of themes to suit various occasions.  


She only brought a sampling of stickers from her line, so I encourage you to visit her Etsy store to see more.

The next booth I stopped at was Peace_Aloha_Shakas, who carried a great selection of cute charms for my planner.


I was able to buy 3 different Pokeman charms (including Pikachu) for my daughter to put on her planner. I also bought the simple silver circle with pink elastic for my Marion Smith Planner.
Peace_Aloha_Shakas Pokemon Planner Charms
Another fund booth, I stopped by was the "Uglidori" table where Dania Salgado makes these beautiful custom fabric Fauxdoris and keychains.

She had a donut themed Fauxdori with pockets that I just had to have.

As well as these tiny fauxdoris in assorted patterns and fabrics.  These are so darling. Diana also has an instagram account @pageflagfeen  where she posts some of her planner layouts.
 

Diana was kind enough to make me a miniature fauxdori to match my larger fauxdori. It is really cute.

For those who want to know what was in the Marion Smith Planner Retreat swag bag and a look at the various cute swap items I got, I will be posting part III soon.

I should mention that Marion Smith now has her products on Amazon which makes it easier to find them.  I particularly like the Marion Smith 30 day planner which I use for blogging to plan my next 30 blog posts.  It really helps keep me organized. If you want to see a flip through video of that planner, just leave a comment below to let me know.

Note: This is part 2 of my event review for the Planner Event (Planner Meet Up). if you want to read Part 1 just click here.   Also, this post is not sponsored, I paid for my ticket just like everyone else who attended.

2016 Planners Lovers Retreat in Pasadena, California | Event Review


If you love planning and want to be inspired by other planner lovers, then attending a planner meet up, planner conventions or planner con type of events is a fun way to meet other people who share your love of planning.  The events can very from an all day event to a two hour planner meet up where you just join a group of fellow planners and work on your planners.  The Marion Smith 2016 Planner Lovers Retreat retreat was an all day event that was held in Pasadena at the Convention Center which is located right in the middle a fun shopping area that is rich with restaurants, museums, and other fun things to see.

This retreat had a fun selection of vendors present who offered a great assortment of planner goodies. I was on the hunt for a new planner for 2017 was happy to find the "Green and Lyme" planner booth.

Jessica Lam is the founder of Green and Lyme and was a delight to meet.


The Green and Lyme vegan leather planners have so many helpful features for anyone with a busy work and family activity schedule.  The planners feature ultra thick paper that can handle most pens.


I haven't tried a fountain pen on it yet, but will in a future review. The planners comes in four beautiful colors which are the Mermaid (Teal), Ballerina (pink) which you see above),

Midas (gold)


and Luster (silver).

I really loved the pebbled texture of this faux leather planner and you can really see the quality of the stitching in this photo.

Jessica did not have any planners available to take home that day but she was taking advance orders on those planners (she now has them in stock on her website).  I purchased the silver Planner and will do a future review on it. Additionally she sold some really cute planner clips in a variety of shapes like a camera, coffee cup, the diamond below and others.  Jessica also sponsored a give away at her booth for one lucky winner.


Another booth that I shopped at was "The Delightful Deer" where I got a chance to meet Betsy who designs all the wonderful pieces she had on display.  She also has some great planner inserts on Etsy that you may want to take a peek at.

I purchased a really fun metal star planner charm from her. She is constantly updating her Etsy store, so you never know what fun planner goodies she has to offer.


Theresa D.  (Instagram @mydocumentedlife) had a Travelers Notebook Workshop available where for a small fee she provided the Travelers Insert and the supplies to decorate the Insert.

I really enjoyed stopping by this table.  She had some beautiful layouts in her Travelers Notebooks.

Theresa is a great teacher and is currently offering on online travelers notebook class through the Big Picture Classes website.

She was had some fun wood Die Cuts (Wanderlust) that could be add to our Travelers Journal insert,

planners or for card making. These are really thin wood die cuts (thinner than most puffy stickers).

Theresa also sponsored a give away which I won.  She gave me a Webster Pages Travelers Notebook in a beautiful brown color and a Xyron Sticker Maker which was so unexpected and so appreciated.

This blog post has started to get a bit long so I will continue on another post but at least you are able to get an idea on what this retreat had to offer.

Note: This is not a sponsored post, I paid for my tickets just like everyone else did.