Alex Fab Badge Maker Review
My children and I got to spend time with our cousins this past holiday weekend. The girls love learning new kids crafts, so we decided that testing out the "Fab Badge Maker" kit would be a fun activity for a nice summer day. The bunny to the left is wearing a bunny bow pin that my daughter made with this kit.
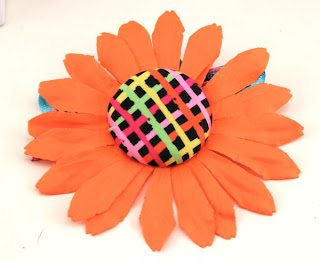
The Alex "Fab Badge Maker" kit recommends the "Fab Badge Maker" kit for kids 7 years old and up. The list price is $21.99 and an online search found that the actual retail price varies. What makes this kit different from so others badge (pin) kits, is that that it so easy to use and with a lot less parts. Additionally, you can use fabrics and other ephemera with it. This is not a traditional pin making kit since the designs of the pin are for utilizing fabric and not the traditional paper.
The instructions have good simple step-by-step drawings on how to assemble the badge. The "So-Easy Badge Maker" was a little tricky for my eight year old cousin to figure out. There is a small learning curve for little fingers to learn to use it correctly. However, once they play around with it for a bit, it gets easier. The twelve and fourteen year olds, did not have any problems figuring out how to use the badge maker. It is not time consuming and will hold their interest for the short time it takes to create a fun little badge (pin).
The Box of Supplies includes:
10 Badge parts ( 10 each of the tops, backings, and snaps)
1 So-Easy Badge Maker
12 Fabric Circles
12 Glitter Stickers and Gems
1 Instruction sheet
 |
| So-Easy Badge Maker |
 |
| Fabric circles included in kit. |
Floral Planter Badge Project
For my first project, I decided to make a flower plant stick that one of my daughters could use to give to a teacher aid at school. The supplies for most of it were in the kit, I just added some floral petals, a glass container, dirt, moss and a small plant.
The first step is to take one of the pieces of fabric circles and place onto the "So-Easy Badge Maker".
You will push one of the badge tops like you see below into the "So-Easy Badge Maker".
Then you need to push down all the fabric to flatten it a bit. If any of the fabric covers the small center circle, just remove it and start over to get it centered. Watch your layers, if you cut things just right you can add layers of various materials to the pin. The snap will not hold if there is fabric covering the center circle.
Then add the floral petals. If the center hole on the petal is too small, just cut a hole big enough to fit.
The next step is to push the backing piece into position and hold the layers of material in place until you
can put the back snap piece in place and snap it in securely. Listen for the snap sound to be sure the pin backing are on securely, otherwise it will fall apart when you remove from the "So-Easy Badge Maker".
Next, you will carefully remove the badge from the badge maker.
And it will look like this.
The kids thought it looked a bit boring so they voted that we add one of the cute stickers included in this
kit. They were right, it did look cuter.
Ribbon Accent Project
I saw some really nice gift box ribbons at the gift counter at my local department and thought how nice they were. However, at $7 for one ribbon, that was a bit steep for my budget. So when I saw these badges, I realized I could make my own version of those ribbons.
I took the ribbon and cut about a 3" piece. Then I removed the wiring that ran on both sides of the
ribbon. I also trimmed any excess from the ribbon.
The remaining ribbon fit well into the badge maker.
The ribbon was a bit stiffer fabric than the fabric circles that are included in this kit. So I had to hold
them down until I could put the backing and the snap piece onto the badge maker.
I carefully removed the badge.
I made the rest of the bow with the same ribbon and pinned the badge to the bow. It looked just like the ones at the store.
Bunny Pin On Hat
My daughter loved the bow idea and decided to make the third project. Her bunny needed a hair accent to go with her ice skating outfit. So we looked at the supplies and figured out what we need and added to it from things we had in the craft box.
We added ribbon, lace, and a few other small items. My daughter was very proud of her finished piece.
Below are a few other pieces that the kids enjoyed making. They went through my scrap drawer and found some different items to add to their badges like:
We are still working on my daughters mini altered scrap book, so she made a badge (pin) to put onto the page below. The pink and blue pin has some beads, ribbon, floral die cut, and a butterfly glued onto it.
The next badge is made with paper die cut flower, I had left over from a scrapbooking project. The petals were added in the same way I that I added the silk flower petals.
 |
| Paper Flower petal Pin |
A happy face pin which is very simple and takes less than a minute to make.
The black and orange flower stick below is made from an old black t-shirt, paper leaves,
and folded paper (using the Martha Stewart Scoring Board). Then the kids just glued the pin onto a stick.
All of these were easy to make. As you can see, there was a range of different looks reflecting the different personalities of each girl. There was a short learning curve for the younger girls but that did not stop them from having fun with these badges. Another plus is that the pins spin, so you can easy add googly eyes or something similar to take advantage of the spin affect.
Disclosure


Fun projects, thanks for sharing. I especially love the one you made with the scrap left-overs. But they all look like a blast!
ReplyDeleteGreat post, so informative!
ReplyDeleteThe badge-making kit looks great, are you able to buy the spare parts from somewhere once you've made the 10 badges that come with the kit?
I do not know if there are... you may want to contact the manufacturer to find out. It might be one those cases where it is cheaper to buy a new kit than to buy refills. I did not find a refill kit for the badge maker on their site at: http://bit.ly/18FVU5K. However, you can find the kits pretty affordably on Amazon, Target and online craft stores.
DeleteI'm also wondering if there are replacement badge/button parts. Are there? It would be awful to have to keep buying a whole kit to make more than 10 buttons.... Thx
ReplyDeleteI would also like to know if there are replacement parts (buttons, backs, pins) for this kit. Are there?
ReplyDeleteThis comment has been removed by the author.
DeleteI could not find out if they still sell a refill kit for the badge maker. If you are planning on making a lot of pins, this is not a good kit for that. It is created as merely a craft project for kids. Amazon does carry a similar badge maker (Cool Badgemaker) that you might want to check out. I do not have personal experience with the "Cool Badgemaker" so you might want to read the reviews on it.
ReplyDeleteI'm wanting to buy this for a design project but I want to make paper badge instead. Can I use this badge maker with traditional paper?
ReplyDeleteIt would not be cost effective to use with paper. There are cheaper kits for use exclusively with paper badges on Amazon.
DeleteImpressed alot.I really like your blog.
ReplyDeleteThanks for the post. Button Badge Maker
Interesting blog attracted me.I hope you will post more Updates. Thanks for the post. Pop Up System Services In Malaysia
ReplyDeleteInteresting blog attracted me.I hope you will post more Updates. Thanks for the post. Fridge Magnet Services In Malaysia
ReplyDelete