My reviews are based on my personal experience with a product or event. I am not a professional product tester nor do I get paid for any of my blog posts.

The items that I post reviews on, have either been purchased on the internet or through a local vendor. Additionally I will review items that I got on sale, as a gift or as a sample from either the manufacurer or some other source.

Note: always read the manufacturers directions on how to properly use a product and craft carefully. Additionally, I am an Amazon Associate and may earn a few cents (literally) from your clicking on my Amazon links. Since they raised the minimum payout from earnings to $10 I haven't seen a credit for a while but eventually I will get one.

Every penny counts when trying to set a budget to get supplies to use for my reviews, tutorials and hauls. However, you do not have to use my links. You can use your favorite search engine to find the best price for your budget.

My experience with Folk Art Enamel Paints for glass.


The Plaid company  Folk Art Enamel Paints are created specifically for painting non-porous surfaces (any glass, metal, ceramic).  Folk Art Enamels are non toxic and dishwasher safe (once cured).  Before they are dry, the paints can be cleaned up with soap and water which makes working with them easier. This is a completely different type of paint so do not mix or use water with these like you would with acrylics. Additionally, the manufacturer directions say to bake finished items in oven for 30 minutes at 350° or let dry for 21 days to cure completely.  After which the piece becomes dishwater safe if put in the top rack of dishwasher.

Here is a list of the Folk Art Enamel Paint colors that I had to work with:

  • 4001 Wicker White
  • 4017 Lemon Custard
  • 4132 Parisian Pink
  • 4120 Soft Apple
  • 4025 Cobalt
  • 4133 Lipstick Red
  • 4032 Licorice

So what products work well with these, well there are the Plaid Enamel brushes, the Enamel peel-and-stick stencils and the daubers.

Plaid Folk Art Enamel Brushes


The kit came with Folk Art Enamel brushes which have special soft bristles for using with the enamels so you get better results when using them to paint on non-porous surfaces with the enamel paints. They look and feel like the one-stroke brushes but they serve a different purpose.  Look for the light green color (instead of the dark green) on the handle in the painting section of the craft supply stores.

Plaid Folk Art Enamel Peel-and-Stick Stencils

The kit came with these fun floral and the butterfly stencils.  They have a sticky back and stick to glass, ceramic, and other non-porous surfaces.  They are re-useable at least 20 times.  The packaging recommends cleaning them between uses and store them on the mat provided in the packaging.  You can use the Plaid daubers  or the special paint brushes with these stencils, which makes using them easier to use.  

Plaid Paint Daubers Set

The daubers are helpful when using the peel-and-stick stencils.  The daubers can be used to apply the paint onto the non-porous surface. The package has several different sizes so you can achieve a variety of results. 

Testing the colors
The first step was to check the colors to see how they look on a opaque glass surface.  The white background really makes the colors pop.

I also wanted to see how these paints would look on black ceramic, so I painted some of the colors onto the plate surface and was pleasantly surprised to see how well they showed up.


The third sample shows how the colors look on glass.  This give me a chance to see which ones were opaque and which were a little more translucent.

The fourth sample shows the same glass surface on a light source.
This sample really shows how opaque the black and white colors are.  The other colors are more translucent and will show brush strokes if I do not apply the paint properly.  I think the white background shows the beautiful colors off the best, however, the paint looks good on all the surfaces (depending on my brush strokes).

First Project

My first project is to paint a simple picture frame.  I just wanted to see how the paint, peel-and-stick stencils, and the daubers would work on a simple frame.  The first thing I did was wash the surface of the frame and let it dry.  Then I cleaned it again with rubbing alcohol to remove any oils that might have been on the surface.


I covered the frame with some painters tape so I could measure out the lines for the background of the frame.  Then I painted in the white lines.  I removed the tape while the paint was still wet.  Then I painted in the pink.

I used the multi flower stencil from the floral collection (30459).  I placed it on the frame, making sure to press down to secure it before painting the surface of the photo frame.

I used the daubers to paint in the stencils, starting with the yellow followed by
the pink.
Once I removed the stencil I realized the design was too small to work with the large strips that I had previously painted onto the frame.  Thus, I decided to wipe off the paint and start over with a different stencil.

Additionally, there is a small learning curve with the peel-and-stick stencils.  You should practice on a different item with a similar surface until you get the results you are looking for.  Basically it is all about how you load the paint onto the dauber or paint brush.....and how you apply it to the surface.  Truly the simplest results are by utilizing the traditional tap technique.  Just tap onto the surface, the first tap will be translucent.  However, if you want a more opaque result, then you can keep adding layers of color.  I also found that by using white (which is a more opaque color) first and then layering the other colors on top of the white, I got results very quickly.
Repainted with larger flower stencil.

For my second project, I decided to paint a vase that had a cool design on the glass.  I started with the stem.

Then I filled in the rose.  I love the fact that this project was done so quickly with great results.

I read on the Plaid website that these enamel paints were great to use with the "One Stroke" painting techniques.  So decided to try the one stroke technique out on a glass surface.  I started by loading the brush with
Parisian Pink and Wicker White.  Then I painted it onto the glass.  It looked pretty good.

For my third project,

I decided to see how that technique using the enamel paints would work on a ceramic sugar jar.

So I began with the lid which looked like it could be cool with flower painted onto
it.  I used the one stroke technique to blend the two colors together to create petal.  It looked pretty good, especially since it was my first try at it.
I then used the dauber to paint the knob yellow.  Since I did not have orange, I blended yellow with red to create an orange color to finish off the lid.
I tried the same technique on the side of the creamer.
I did not like the way it looked, so I took a baby wipe and removed the flowers.  I decided to paint the rest of the jar with the yellow (Lemon Custard) and pink (Parisian Pink) enamels. 

The Folk Art Enamels are available in 38 colors.  The colors are rich and fun to work with and can be purchased at larger craft stores or on the Plaid website.  I have seen folks paint wine glasses, cookie jars, cake stands, glass dishes, cups, etc.  The designs have varied from floral to funky.  The Plaid website has some video tutorials of Donna Dewberry painting some quick & easy projects with the enamels.

Tips:

  • Shake bottles well before using.
  • If you are painting a glass, remember not to paint on the rim or any area that the mouth or food could come in contact with.
  • Prepare project for painting by washing with soap and water.  Once the surface has dried, then clean area a second time with rubbing alcohol.  Allow the surface to dry completely before painting it with the enamels.
  • If you don’t like what you made, it is easy soap and water clean up to remove the paint (as long as it is uncured) so you can start over.
  • The Plaid website has all types of fun tutorials, including those by Cathie Filian and Steve Piacenza as well as Cathie Filian's own daily blog (of which I am a big fan).


    My experience with the Fab Badge Maker by Alex Crafts

    Alex Fab Badge Maker Review


    My children and I got to spend time with our cousins this past holiday weekend.  The girls love learning new kids crafts, so we decided that testing out the "Fab Badge Maker" kit would be a fun activity for a nice summer day.  The bunny to the left is wearing a  bunny bow pin that my daughter made with this kit.

    The Alex "Fab Badge Maker" kit recommends the "Fab Badge Maker" kit for kids 7 years old and up.  The list price is $21.99 and an online search found that the actual retail price varies.  What makes this kit different from so others badge (pin) kits, is that that it so easy to use and with a lot less parts.  Additionally, you can use fabrics and other ephemera with it.  This is not a traditional pin making kit since the designs of the pin are for utilizing fabric and not  the traditional paper.

    The instructions have good simple step-by-step drawings on how to assemble the badge.  The "So-Easy Badge Maker" was a little tricky for my eight year old cousin to figure out.  There is a small learning curve for little fingers to learn to use it correctly.  However, once they play around with it for a bit, it gets easier.  The twelve and fourteen year olds, did not have any problems figuring out how to use the badge maker.  It is not time consuming and will hold their interest for the short time it takes to create a fun little badge (pin).

    The Box of Supplies includes:

    10 Badge parts ( 10 each of the tops, backings, and snaps)
    1 So-Easy Badge Maker
    12 Fabric Circles
    12 Glitter Stickers and Gems
    1 Instruction sheet
    So-Easy Badge Maker


    Fabric circles included in kit.


    Floral Planter Badge Project

    For my first project, I decided to make a flower plant stick that one of my daughters could use to give to a teacher aid at school.  The supplies for most of it were in the kit, I just added some floral petals, a glass container, dirt, moss and a small plant.
    The first step is to take one of the pieces of fabric circles and place onto the "So-Easy Badge Maker".

    You will push one of the badge tops like you see below into the "So-Easy Badge Maker".
    Then you need to push down all the fabric to flatten it a bit.  If any of the fabric covers the small center circle, just remove it and start over to get it centered. Watch your layers, if you cut things just right you can add layers of various materials to the pin. The snap will not hold if there is fabric covering the center circle.
    Then add the floral petals. If the center hole on the petal is too small, just cut a hole big enough to fit.
    The next step is to push the backing piece into position and hold the layers of material in place until you
    can put the back snap piece in place and snap it in securely.  Listen for the snap sound to be sure the pin backing are on securely, otherwise it will fall apart when you remove from the "So-Easy Badge Maker".
    Next, you will carefully remove the badge from the badge maker.
    And it will look like this.
    The kids thought it looked a bit boring so they voted that we add one of the cute stickers included in this
    kit.  They were right, it did look cuter.

    Next I added a stick and placed into the planter.  It was so easy and very fast to make.
    Ribbon Accent Project

    I saw some really nice gift box ribbons at the gift counter at my local department and thought how nice they were.  However, at $7 for one ribbon, that was a bit steep for my budget.  So when I saw these badges, I realized I could make my own version of those ribbons.

    I took the ribbon and cut about a 3" piece. Then I removed the wiring that ran on both sides of the
    ribbon.  I also trimmed any excess from the ribbon.

    The remaining ribbon fit well into the badge maker.

    The ribbon was a bit stiffer fabric than the fabric circles that are included in this kit.  So I had to hold

    them down until I could put the backing and the snap piece onto the badge maker.
    I carefully removed the badge.

    I made the rest of the bow with the same ribbon and pinned the badge to the bow. It looked just like the ones at the store.


    Bunny Pin On Hat

    My daughter loved the bow idea and decided to make the third project.  Her bunny needed a hair accent to go with her ice skating outfit.  So we looked at the supplies and figured out what we need and added to it from things we had in the craft box.

     We added ribbon, lace, and a few other small items.  My daughter was very proud of her finished piece.


    Below are a few other pieces that the kids enjoyed making.  They went through my scrap drawer and found some different items to add to their badges like:

    We are still working on my daughters mini altered scrap book, so she made a badge (pin) to put onto the page below.  The pink and blue pin has some beads, ribbon, floral die cut, and a butterfly glued onto it.

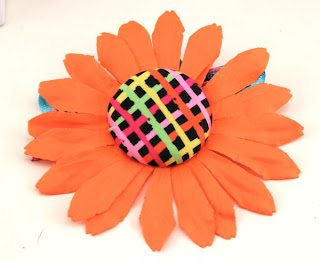
    The next badge is made with paper die cut flower, I had left over from a scrapbooking project.  The petals were added in the same way I that I added the silk flower petals.
    Paper Flower petal Pin
    Next we went through the bead box to see what would work with these cute pins:


    The pink ribbon ribbon bracelet made with some ribbon and rhinestones.
    A happy face pin which is very simple and takes less than a minute to make.

    The black and orange flower stick below is made from an old black t-shirt, paper leaves,


    and folded paper (using the Martha Stewart Scoring Board).   Then the kids just glued the pin onto a stick.


    All of these were easy to make.  As you can see, there was a range of different looks reflecting the different personalities of each girl.  There was a short learning curve for the younger girls but that did not stop them from having fun with these badges.  Another plus is that the pins spin, so you can easy add googly eyes or something similar to take advantage of the spin affect.


    Disclosure