I always love seeing the cute little DIY Halloween themed
haunted house vignettes or shadow boxes that I see posted on Pinterest so I
thought I would try to make one this year.
I started by purchasing a really cool basic Halloween Haunted House
Shadow Box Kit from Michaels Craft store.
After using my 40% coupon I ended up paying around $12 for the kit. The kit is pretty inclusive. It has almost everything you need to make the
fun Halloween Vignette, and yet it allows the maker to still add a few personal
touches to it.
Materials Needed:
Recollections Halloween Paper House Box from Michaels Crafts
Asst Halloween Themed Stickers
Asst Halloween pins
Asst Charms
Supplies Needed:
Martha Stewart Crafts – Fluorescent Acrylic Paint in Orange
Martha Stewart Crafts – Fluorescent Acrylic Paint in Yellow
White Gesso
Glue Dots
Glue Stick
Scissors
Tweezers
Sponge Paint Brush
Step 1:
Since the house is made of brown paper, I realized I would
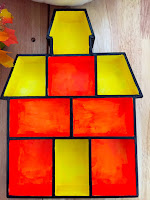
need to pick a base color. So I painted the
interior of each room of the haunted house shadow box in one coat of white gesso
(do not paint the outside parts). This
will create a nice base to show off the different colored paints that are used
to paint it with.
Step 2:
Using the Martha Stewart Glow-in-the-Dark acrylic craft
paints in Orange and Yellow, I painted the interiors of each room in the
Recollections Halloween Paper House Box in alternating colors. Then I set it aside to allow the shadow box
to dry.
Step 3:
Then using the Black Chalk Paint, I painted the outer
surfaces of the house. I love this paint
because it is really opaque and covered the entire surface in one coat. Once I
had finished painting the surface, I set it aside and allowed the shadow box to
dry.
I took some of the fun Halloween themed scrapbook papers I
have and cut them down to fit the rooms.
I also used some of the cute papers provided in the kit. I glued them onto the back wall of each room
using a glue stick. The paper patterns
or pictures will create the theme for each room and make it easier to decide
which items to place in there. I could
have followed the photo provided in the kit but I decided to do my own thing
and loosely follow their example.
Step 5:
I sorted through all of the ephemera provided in the
kit. I added additional charms, tags,
pins, etc. from my own collection of Halloween themed items to work with.
Step 6:
Once I decided which items I wanted to use, I started to
decorate each room. I used the glue dots
to hold some of the heavier jewelry items in place.
Step 7:
To finish the DIY Halloween Haunted House Shadow Box, I
decided to accent the outer frame of the house by adding black lace, ribbon,
and few other items.
I love how it turned out.
I even used some light up pins to make it a bit more fun to look
at. Once the paint had dried, the actual
part of decorating the shadow box only took
a short time to finish.
This is my first try at a Halloween themed shadow box, I
would love to know what others have used to decorate their boxes. Leave a comment below and share your
experience in making one of these DIY Halloween Shadow Boxes.
Once again, I would like to thank Plaid Enterprises for that cool box of paints they sent me. I am able to apply them to so many projects. If you want to see more creative Halloween projects, Plaid does have a bunch on their website, including their 75+ No Carve Pumpkin Decorating Ideas Post.
Once again, I would like to thank Plaid Enterprises for that cool box of paints they sent me. I am able to apply them to so many projects. If you want to see more creative Halloween projects, Plaid does have a bunch on their website, including their 75+ No Carve Pumpkin Decorating Ideas Post.


